Showing posts with label Decor Amour. Show all posts

Thursday, August 26, 2010

Project: Tissue Paper Pom-Poms

Needed:
  • tissue paper (20x30" sheets)
  • cloth-covered floral wire
  • scissors
  • patience and a gentle hand

End Result:

Thanks Martha!

Getting Things Done With Martha!

K recently gave me a stack of Martha Stewart Weddings magazines. Holy Inspiration! With those magazines and the awesome encouragement of my girls K and E, I pretty much have all the details worked out. Which, 9 months from the Big Day, is an accomplishment. But I suppose the hard part has never been figuring things out. With a DIY wedding, the hard part is getting stuff done! I seriously will need to assemble a "craft crew". It really is exciting though being able to imagine how things will look, all put together and waiting beautifully in the reception hall. I'll soon be scanning pages from the magazines to share my ideas with everyone -- stay tuned!

Monday, April 5, 2010

Making Compromises...And Coasters

So.  Some recent events and decisions in mine and C's lives have prompted a closer look at the wedding budget.  And that prompted subsequent cutbacks.  As a result, I've decided to use the reception hall's centerpieces after all.  They're a shallow, square dish with a layer of clear, glass vase gems and a small oil lamp in the middle.  Perhaps toss in a couple button mums to coordinate with the spider mum on the tables.

Or, my super-creative sister-in-law came up with the idea of incorporating old vinyl album.  We were thinking as maybe a charger plate of sorts but then I found this really neat DIY project:


On About.com

Maybe a little stinky but C's bro has a torch or two so we could probably do it outside instead of in an oven.

Then I saw an awesome DIY tutorial for making your own coasters and thought they would be absolutely perfect favors (and tabletop decorations) to go along with the custom pint glasses.  The coasters look so easy to do!


On Style Me Pretty

Truly, scrapbooking paper, wall tiles, and modge podge.  So I'm going to use the scrapbook paper I featured earlier with my table decoration idea.  There's a Reuse/Recycle Center in my town that I know has tons of wall tiles (and LPs).

Chalk a few more projects up on my wall.  It'll be time for a craft day soon.

Tuesday, March 9, 2010

Centerpiece Take 2

In one of my first posts I declared a love of simplicity.  Getting swept up in wedding details, I kind of lost track of that.  I went back and looked at my previous "apothecary centerpiece" image board and had to laugh at myself.  Three jars on each table?  Really?  Filled with how many different things?  Is that necessary?

So I simplified my plan a bit and found a neat jar that had three stacking compartments.  It's about 12 inches high ("experts" say centerpieces should be under 14 inches or above 30...)  Each compartment will highlight an item.


The black river rocks will go in the bottom compartment, the moss and LED votive candle will go in the middle, and a purple flower (maybe a rose, maybe not) will go in the top.  Interesting, not complicated.  And, in the end, easier to manage and a lot cheaper.

On Top of the Table

In looking at a lot of reception photos on wedding websites, I noticed that most of them are white on white on white with some colorful flowers as a centerpiece.  Some of them don't even have colorful centerpieces.  To me, too much white screams sterile and yuck -- who wants to start a marriage that way?

To express my love of 'color' and 'interesting' I wanted tables that would pop; not just with a centerpiece but as a whole presentation.  The reception hall we're using offers white or ivory table linens with a few different color choices for napkins.  You can rent coordinating table runners in a solid color as well.  I wanted my tables to have something: table runner, placemat, charger plate (which are really pricey by the way!)  I thought about making my own table runners -- that way I'd get exactly what I want and I could sell/donate/regift them after the wedding.  Then I found this great photo at theknot.com and immediately knew what I wanted.

I took a trip to Jo-Ann yesterday (coupon commotion, woohoo!) and thought I'd browse a bit to see if anything jumped out at me for table runners.  Of course, something did and I could feel that 50% off coupon burning a hole in my pocket.  However, knowing that I can be a bit impulsive  and getting tired of returning fabric that I've impulsively bought in the past, I put it in the cart to think about it while I kept walking.  (Another of my mom's great tactics: "Let's put it in the cart and think about it.")

I wandered over to the scrapbooking aisle because I'd seen some really neat ideas for escort cards.  The 50% off rack was staring at me with alluring eyes and as I coyly gazed back I saw it: a stack of paper that perfectly coordinated with the fabric in my cart that I was supposed to be thinking about.  The stack even featured every one of my wedding colors.  I did a little happy dance, hugged the stack and quickly rushed to the cutting counter.  Thinking done.  Mind made up.  Here's what I got:
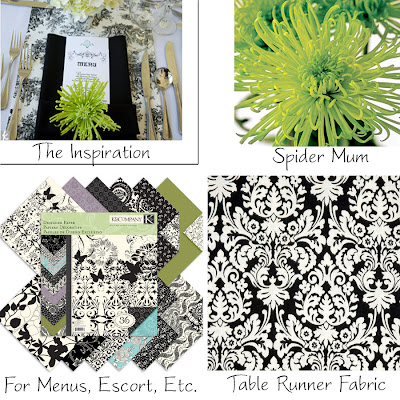


Hey mom, feel like sewing some table runners?

Thursday, February 25, 2010

DIY Decorative Balls

Decorative balls are in home stores everywhere, but why pay $5-10 each when you can just as easily make them?  Here are some great ideas I've found:

From HGTV:

From "We Can Make That"
Stuff Needed:
styrofoam balls in different sizes
preserved eucalyptus leaves
decorative pins
moss
rope or twine
low-temperature hot glue and glue gun

Steps:
Eucalyptus Leaf Ball
1. Begin at the top and place the first eucalyptus leaf as desired.  Secure it with a pin or glue.
2. Continue until the entire ball is covered.

Moss Ball
1. Glue or pin moss over entire surface of the ball.
Rope Ball
1. Glue the rope or twine to itself in a small circle for a starting point.  Tack this end onto the ball with a decorative pin.
2. Continue gluing the rope in circles and covering the ball completely.


From Kreative Knack:

From "We Can Make That"

Stuff Needed:
Colored Ball Ornaments or
Painted Styrofoam Balls
Glass Vase Gems
Hot Glue and Gun

Steps:
1. Glue gems on ornaments or styrofoam balls to cover entire surface.


You can really do this with just about any medium.  Use little silk flowers to make a tiny pomander.  Use dried lavender or chamomile to make a potpourri sphere.  I've also seen neat ones with pieces of cut twigs glued vertically to make a sort of "porcupine".  Tons of fun.  Limitless possibilities.


Monday, February 22, 2010

Old School New Trends

I love tying in the old with the new and I especially love the look of apothecary jars!  This is a fun idea because it has a whimsical, foresty feel.  These items are also neat because they get away from the traditional foofy flower arrangements and tie in some different natural pieces: pinecones, berries, fruit and bean pods, etc.  I don't know about incorporating any candles (maybe LED).  I'm thinking another eyecatching touch might be to bunch some moss around the bases of the jars.  Or tie a wide black ribbon around the lid of the tall jar.


From "We Can Make That"

Might not use everything pictured but it's a good plan so far :)