Thursday, August 26, 2010

Project: Living Centerpieces

Needed:
  • smallish plant pot
  • potting soil
  • variety of small green plants (ie lily-of-the-valley, hens 'n' chicks, etc.)
  • room to store and mind to care for 17 living centerpieces

End Result:

Project: Tissue Paper Pom-Poms

Needed:
  • tissue paper (20x30" sheets)
  • cloth-covered floral wire
  • scissors
  • patience and a gentle hand

End Result:

Thanks Martha!

Getting Things Done With Martha!

K recently gave me a stack of Martha Stewart Weddings magazines. Holy Inspiration! With those magazines and the awesome encouragement of my girls K and E, I pretty much have all the details worked out. Which, 9 months from the Big Day, is an accomplishment. But I suppose the hard part has never been figuring things out. With a DIY wedding, the hard part is getting stuff done! I seriously will need to assemble a "craft crew". It really is exciting though being able to imagine how things will look, all put together and waiting beautifully in the reception hall. I'll soon be scanning pages from the magazines to share my ideas with everyone -- stay tuned!

Friday, July 9, 2010

Time Flies Whether You're Having Fun Or Not

Seriously, I don't know where the past 6 months have gone. My wedding timeframe went from 17 months to less than 12 very quickly -- I'm getting married in 11 months! Normally I would think that's tons of time but really, it does slip by unnoticed. Anyway, here's an update:

I changed my layout to the blog -- our stationery features a hummingbird so I thought it only appropriate.

Here's the new Bridesmaid Dress:

It's from the Purely Alfred Angelo line which boasts "eco-friendly" fabrics (this one is silk chiffon) in wear-again styles. I love it -- I'd like to get one for myself! Although, as always, I'm undecided on color. Unfortunately the style doesn't come in black so I have to choose between the above blue or a really nice olive-y green. I had thought about doing 2 girls in one, 2 in the other -- then I considered doing the girls in one color and the guys in the other -- but then I could always just do everybody in one color and find something else to feature the other.

Isn't it silly that the hardest part of planning the wedding decor has been color coordination?

Of course, then I think since I have 4 colors I can feature 2 on the wedding party and 2 on the tables. That gives me blue and purple on our peeps -- black and green on the tables. Majority. Not saying there won't be mix and match. Also not saying I won't change my mind again in 5 minutes...

Just found silk-screened 100% silk ties on Etsy:

by Projector
That would be kinda fun. And maybe a nice gift.

Work on my dress is underway. I'm totally in love with my silk -- it has such a beautiful sheen and texture.

Oh, and I decided that I want purple shoes. Something fun like this:

Monday, May 17, 2010

Pretty Princess

Next Sunday the girls and I are going to the bridal salon. The girls will be trying on dresses to gauge sizing for the dress I've picked -- and I'll be trying on bridal gowns because it looks like fun. When my best friend, K, suggested this I was a little nervous. What if I fell in love with a dress? K promptly promised to talk me out of anything -- "No way! It makes your butt look waaaay too big!" It should be fun though. Who doesn't like a day out with the girls trying on thousand-dollar dresses?

Thursday, April 15, 2010

Concept Complete!

After much deliberation and seam-ripping and re-doing, I've finally finished the mock-up for my wedding dress.  Yes it is pink and striped.  It is just a design idea.  However, two key design aspects it does not yet reflect are the fullness of the skirt (I haven't finished the petticoat yet) and the pleated overlay on the bodice.  The real dress will also have a mini-train and pearl beading detail down the center pleat on the skirt.  It's rough, I know.  The seams were quick and sloppy, the edges are unfinished; I didn't even iron it.  Tim Gunn would be appalled.  The real thing though -- it's gonna be a beauty.  I'm sure of it.

FRONT
Strapless, sweetheart neckline, asymmetrical dropped waist


SIDE FRONT
Three pleats down side of "low" hip


BACK
Will feature a mini-train as long as fabric will allow


SIDE BACK
Side zipper, unlike me the dressform has no junk in her trunk

Tuesday, April 13, 2010

If Two's Company And Three's A Crowd, Four Must Be A Party!

In a rather lovely turn of events, I now have four beautiful bridesmaids.  I also learned that there is no way to define the term "best friend" until you spend a day out with said candidate.  If you are having breakfast together and your food gets stone cold because you're too busy talking about everything and finding you have everything in common -- that's a best friend.  If you are at a clothing boutique and pick out the cutest dress, turn to show it to your friend and find she is pointing out the same one to you -- that's a best friend.  If you go home and feel filled with so much amazing energy that even your fiance says something -- you just spent the day with your best friend.

Sappy stuff aside ;) I need to rethink my bouquet idea.  Four girls, three colors.  Do I have three girls with single colors and one with a combo and me with white?  Do I have two girls with the same single color?  Do I just mix them all?  I'm thinking I'll probably just do the latter.  Then my bouquet will be white/ivory with splashes of color.  Same with the fascinators if I go with those.  Each one will have a combo of colors.  I think I've also decided to forgo the shoe decor in favor of fascinators.  Both would be too much.

So exciting!

Monday, April 5, 2010

Fascinated By Fascinators!

For financial reasons, I will be doing my own hair and makeup for the wedding.  I'm obviously allowing my girls that same option.  So I've been trying to think of an easy way to glam up an otherwise modest 'do.  My wedding dress has a subtle retro flair (think '30s or '40s) with its sweetheart neckline and dropped waist so I figured, why not continue on that "oldschool" trend?  I thought of fascinators immediately.  Fascinators are feathered, flowered and jeweled hair clips that women began to wear in leu of hats in the 18th century.  As all things trendy are cyclical, they're once again vogue.  I've read them described as "part 20s flapper, part glam" and it's a fitting description.


The possibilities are endless.  Since each of my bridesmaids will be "featuring" a different color, I'd like to make them (or give them the creative freedom to design their own) coordinating hairpieces.  I think I'll keep mine ivory.  I found a great DIY tutorial at Corvus tristis.

Making Compromises...And Coasters

So.  Some recent events and decisions in mine and C's lives have prompted a closer look at the wedding budget.  And that prompted subsequent cutbacks.  As a result, I've decided to use the reception hall's centerpieces after all.  They're a shallow, square dish with a layer of clear, glass vase gems and a small oil lamp in the middle.  Perhaps toss in a couple button mums to coordinate with the spider mum on the tables.

Or, my super-creative sister-in-law came up with the idea of incorporating old vinyl album.  We were thinking as maybe a charger plate of sorts but then I found this really neat DIY project:


On About.com

Maybe a little stinky but C's bro has a torch or two so we could probably do it outside instead of in an oven.

Then I saw an awesome DIY tutorial for making your own coasters and thought they would be absolutely perfect favors (and tabletop decorations) to go along with the custom pint glasses.  The coasters look so easy to do!


On Style Me Pretty

Truly, scrapbooking paper, wall tiles, and modge podge.  So I'm going to use the scrapbook paper I featured earlier with my table decoration idea.  There's a Reuse/Recycle Center in my town that I know has tons of wall tiles (and LPs).

Chalk a few more projects up on my wall.  It'll be time for a craft day soon.

Monday, March 22, 2010

The Pain of Waiting....

I'm so bummed.  My supply site for centerpiece stuff no longer carries the apothecary jar I want.  What do I do now? :(

Oh Shoes

A big pickle of DIY is getting that perfect idea in your head, knowing there's a slim chance of finding it unless you make it, then realizing that making it is just totally over your head.

I have in my head a vision of my perfect wedding shoes and they go a little something like this:

Pump.
Peeptoe.
Plaid.

You may say to yourself "I see shoes like that all the time" and indeed, so do I.  The problem is that RED plaid is prevalent and I want any combination of BLUE or PURPLE or GREEN.  I could find the perfect print at a fabric store but everything I read says quite clearly "DON'T TRY TO GLUE FABRIC TO YOUR SHOES!!!"

So then, the conundrum is: Where do I bend?  Or perhaps not "where" (obviously plaid is going to be the thing to go) but "how".

I noticed yesterday that people are buying or crafting some sort of embellishment to clip onto the toe or heel of a shoe for a special occasion, which can then be used as decor on a purse or hat or memento box, etc.

Examples from Etsy.com:


A cute idea.  One that I could have fun replicating with the right amount of sparklies and feathers.  I still want to keep an eye out for my plaid shoes though.....

Friday, March 12, 2010

Best Boutonnieres

I got a really cool idea for the men's boutonnieres the other day since 3 of the 4 (including the groom) are guitar players.  After snooping around the web I found, of course, that it's been done before.  But that's okay....  I can make that.


C is a Fender man all the way (and the little "rock on" hand is so cool!) but when I was a little girl, my dad owned a music store and I remember always wanting to play with the Tortex picks he sold because I loved all the different colors.  So we'll have to see about mixing the two up.

Black Is The New Green

I have a job that sometimes allows my mind to wander for hours on end.  Here is where it wandered yesterday:

One of the reasons I chose to make my own wedding gown is because I couldn't stomach spending tons of money on a dress that, realistically, would never be worn again.  So, why should I ask my bridesmaids to spend a chunk of money on a dress that they might never wear again?  Blue and purple and green dresses would look great, but would they ever pull it out of the closet again?  Probably not.  However, every girl needs at least one (or two, or three...) little black dresses.  Plus, black looks stunning on every body.  So, I think (I haven't talked to my girls yet) I want to do matching black dresses.

I know some "traditionalists" might find black a bit daunting, so of course, we'll spice it up with the bouquets.  I want each girl to carry one color and type of flower (the flowers on the image board are just ideas -- I'll talk to my florist about what's in season), then my bouquet will combine all three.

Tuesday, March 9, 2010

Pretty Pretty Bridesmaids

Love this dress.  Thankfully, my girls like it too.  I can't decide if I want it in plum or blue though.  Or maybe, since I have three bridesmaids, I could do one in each of our colors: peacock, plum, olive.  I hope the style is still around by the time we need to get it!

Centerpiece Take 2

In one of my first posts I declared a love of simplicity.  Getting swept up in wedding details, I kind of lost track of that.  I went back and looked at my previous "apothecary centerpiece" image board and had to laugh at myself.  Three jars on each table?  Really?  Filled with how many different things?  Is that necessary?

So I simplified my plan a bit and found a neat jar that had three stacking compartments.  It's about 12 inches high ("experts" say centerpieces should be under 14 inches or above 30...)  Each compartment will highlight an item.


The black river rocks will go in the bottom compartment, the moss and LED votive candle will go in the middle, and a purple flower (maybe a rose, maybe not) will go in the top.  Interesting, not complicated.  And, in the end, easier to manage and a lot cheaper.

On Top of the Table

In looking at a lot of reception photos on wedding websites, I noticed that most of them are white on white on white with some colorful flowers as a centerpiece.  Some of them don't even have colorful centerpieces.  To me, too much white screams sterile and yuck -- who wants to start a marriage that way?

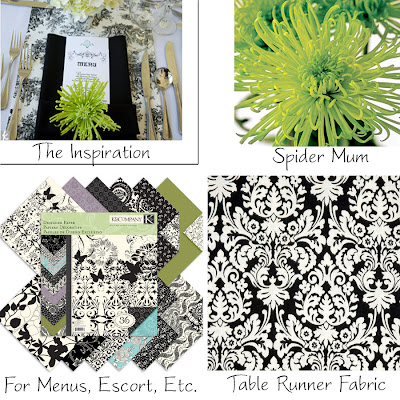
To express my love of 'color' and 'interesting' I wanted tables that would pop; not just with a centerpiece but as a whole presentation.  The reception hall we're using offers white or ivory table linens with a few different color choices for napkins.  You can rent coordinating table runners in a solid color as well.  I wanted my tables to have something: table runner, placemat, charger plate (which are really pricey by the way!)  I thought about making my own table runners -- that way I'd get exactly what I want and I could sell/donate/regift them after the wedding.  Then I found this great photo at theknot.com and immediately knew what I wanted.

I took a trip to Jo-Ann yesterday (coupon commotion, woohoo!) and thought I'd browse a bit to see if anything jumped out at me for table runners.  Of course, something did and I could feel that 50% off coupon burning a hole in my pocket.  However, knowing that I can be a bit impulsive  and getting tired of returning fabric that I've impulsively bought in the past, I put it in the cart to think about it while I kept walking.  (Another of my mom's great tactics: "Let's put it in the cart and think about it.")

I wandered over to the scrapbooking aisle because I'd seen some really neat ideas for escort cards.  The 50% off rack was staring at me with alluring eyes and as I coyly gazed back I saw it: a stack of paper that perfectly coordinated with the fabric in my cart that I was supposed to be thinking about.  The stack even featured every one of my wedding colors.  I did a little happy dance, hugged the stack and quickly rushed to the cutting counter.  Thinking done.  Mind made up.  Here's what I got:


Hey mom, feel like sewing some table runners?

Thursday, March 4, 2010

It Ain't Easy Being Green...

Planning an eco-friendly wedding with minimal impact is really REALLY hard!  And a lot of times it means spending an extra buck (or hundreds...).  It's so incredibly easy to get swept up in everything that surrounds wedding planning and you suddenly realize that you're drowning in clutter and can't clearly see that goals you were striving to meet anymore.  But if I remember correctly, holding true to our tree-hugger values was one of them.

Obviously, C and I don't have the means to have the ultimate green wedding.  There will be energy expended, there will be carbon emitted, and there will be non-local products purchased.  It can't be helped and I'm becoming okay with that.  As I said, earth-friendly isn't cheap and, just as there's no such thing as "free energy", I don't believe that "energy free" really exists either.  You can't create something from nothing but here are a few things we're doing to make our nuptials easier on Mother:

My dress.  Handmade by me.  Automatically eco-chic, right?  Well, not always.  Just because the gown wasn't made in a far-away factory doesn't mean the fabric used to make the gown wasn't.  However, I know that polyester-based fabrics produce tons of waste and use lots of energy to make so I'm sticking with (as much as I can) 100% silk.  Many don't know that silk is a natural fiber woven from the cocoons of little silkworms.

The ceremony and reception.  We're on the brink of deciding to just have the two at the same place.  A truly difficult decision for us because we really want an outdoor ceremony.  However, our reception hall has tons of skylights and windows and a cute little terrace so it'll have to do.  By having the ceremony at our reception hall, we're reducing the need for our guests to travel to different venues.  We're also eliminating the "drag time" between the two events.

The reception hall.  C and I have a lot of out-of-town guests that are invited.  We're also having an open bar.  These two factors automatically decided that we choose a hotel ballroom as our venue so guests will have the option of not needing to drive at the end of the night.

The flowers.  Since the wedding is in June it shouldn't be a problem to find a local greenhouse to supply our blooms.  One with organic practices is preferable of course, but not practical if it's prohibitively expensive.  I love flowers but I'm okay with limiting them to bouquets and boutonnieres.

The centerpieces.  I'm robbing Peter to pay Paul on this one.  The truly eco-friendly thing to do in this case is to just use the centerpieces that the hotel provides (which are totally boring by the way).  However, I'm justifying my stimulation of the economy by creating centerpieces that can be reused, say, as the following year's Christmas gifts.  Apothecary jars are cool and multi-functional -- not like that enormous martini glass from so-and-so's wedding that's been sitting under my sink for five years.......

The food.  We don't have much control over the food because we have to use the hotel's caterer but I am working with them on exploring some organic and locally-produced options.

The cake and cupcakes.  I am lucky enough to have a friend who went to school to be a pastry chef.  If I'm lucky enough to talk her into making my desserts, I can guarantee that they'll be made with organic ingredients and no preservatives.

The rings.  Hand crafted by a local jeweler.

I guess it's kind of like a marriage -- sometimes you have to make compromises to find a solution that best suits everyone.  Imagine that....

Thursday, February 25, 2010

DIY Decorative Balls

Decorative balls are in home stores everywhere, but why pay $5-10 each when you can just as easily make them?  Here are some great ideas I've found:

From HGTV:

From "We Can Make That"
Stuff Needed:
styrofoam balls in different sizes
preserved eucalyptus leaves
decorative pins
moss
rope or twine
low-temperature hot glue and glue gun

Steps:
Eucalyptus Leaf Ball
1. Begin at the top and place the first eucalyptus leaf as desired.  Secure it with a pin or glue.
2. Continue until the entire ball is covered.

Moss Ball
1. Glue or pin moss over entire surface of the ball.
Rope Ball
1. Glue the rope or twine to itself in a small circle for a starting point.  Tack this end onto the ball with a decorative pin.
2. Continue gluing the rope in circles and covering the ball completely.


From Kreative Knack:

From "We Can Make That"

Stuff Needed:
Colored Ball Ornaments or
Painted Styrofoam Balls
Glass Vase Gems
Hot Glue and Gun

Steps:
1. Glue gems on ornaments or styrofoam balls to cover entire surface.


You can really do this with just about any medium.  Use little silk flowers to make a tiny pomander.  Use dried lavender or chamomile to make a potpourri sphere.  I've also seen neat ones with pieces of cut twigs glued vertically to make a sort of "porcupine".  Tons of fun.  Limitless possibilities.


Monday, February 22, 2010

Old School New Trends

I love tying in the old with the new and I especially love the look of apothecary jars!  This is a fun idea because it has a whimsical, foresty feel.  These items are also neat because they get away from the traditional foofy flower arrangements and tie in some different natural pieces: pinecones, berries, fruit and bean pods, etc.  I don't know about incorporating any candles (maybe LED).  I'm thinking another eyecatching touch might be to bunch some moss around the bases of the jars.  Or tie a wide black ribbon around the lid of the tall jar.


From "We Can Make That"

Might not use everything pictured but it's a good plan so far :)

Thursday, February 18, 2010

Forget Safety, Let's Get Dangerous!

When I first started designing my dress it was lace and ruffles and very country.  It was in my safety zone for seamstressing skills.  But as they've said on Project Runway (my guilty pleasure), you can't always be safe if you want to be wow.

I bought the fabric and ended up having something completely different in mind.  The strapless bodice was in a pinched taffeta and the skirt was a-line and dupioni.  To jazz up the bodice my mom and I planned to incorporate some of my late Gramma's pearls.  But again, the design was safe and the silhouette was really boring.

So I went online and started looking at designer dresses.  I knew the basic necklines and knew I wanted strapless or sweetheart.  I also knew all the basic skirt styles and wanted a-line: not slinky enough to be nightgownish but not poofy enough to be obnoxious.  However, I discovered a new element...  The Dropped Waist.  If there was ever a more beautiful way to flatter an hourglass figure, I've not seen it.  Here is my inspiration:

From "We Can Make That"
Sottero & Midgley

My jaw dropped when I saw this dress and I almost considered scraping my sewing project, recouping my losses as best I could, and scraping pennies to go out and buy it.  Then I recovered my sanity.  I don't know how much this dress is.  Honestly I don't really care.  I know I can do that and I'm giddy to try.

I want to incorporate the fabric I've already purchased (the taffeta was special order so I can't return it) so I checked out a few more bodice ideas:

From "We Can Make That"
Sottero & Midgley


From "We Can Make That"
Demetrios: Sposabella

I want to use the taffeta as the main bodice but then wrap it with the dupioni (I would also still use that for the skirt).  I don't want to add any lace or sparkles, we'll stick with my Gramma's pearls.  I was thinking that I may do a taffeta panel on the "low hip" of the skirt too since I ordered waaaay too much.

So I'm ready to go!  I've got six yards of muslin just waiting to become a mock-up....